A step-by-step tutorial for scoping features, allocating funds, and launching without overspending
Learn how to budget and build a meal planning app MVP from scratch. This tutorial covers feature prioritization, realistic financial planning, and a launch timeline designed to hit break-even within 27 months.
TL;DR
Scope your MVP ruthlessly - Limit your minimum viable product to 5 to 7 essential features (meal plans, recipes, shopping lists) and push everything else to future versions.
Know your budget before you build - Custom meal planning app development ranges from $40,000 to $250,000+. No-code platforms like Member Kitchens can eliminate most of that upfront cost for food creators who want to launch quickly.
Set pricing and tiers before development - Your subscription pricing determines your entire financial model, including how much you can spend to acquire each customer (target $11 to $15 CAC at launch).
Launch with a beta, not a bang - Test with 10 to 20 real users, fix critical issues, and only then open to the public. Skipping beta is the fastest path to high early churn.
Track revenue metrics weekly - Monitor trial-to-paid conversion, MRR, churn, and CAC from day one. Vanity metrics like downloads will not tell you if your business is viable.
What You Will Build: A Budget-Conscious Meal Planning App MVP
By the end of this tutorial, you will have a clear, step-by-step plan to take your meal planning app development budget from a blank spreadsheet to a funded, feature-scoped minimum viable product ready for its first paying subscribers. You will know exactly which features to build first, how much to allocate to each phase, and how to avoid the budget traps that sink most first-time app creators.
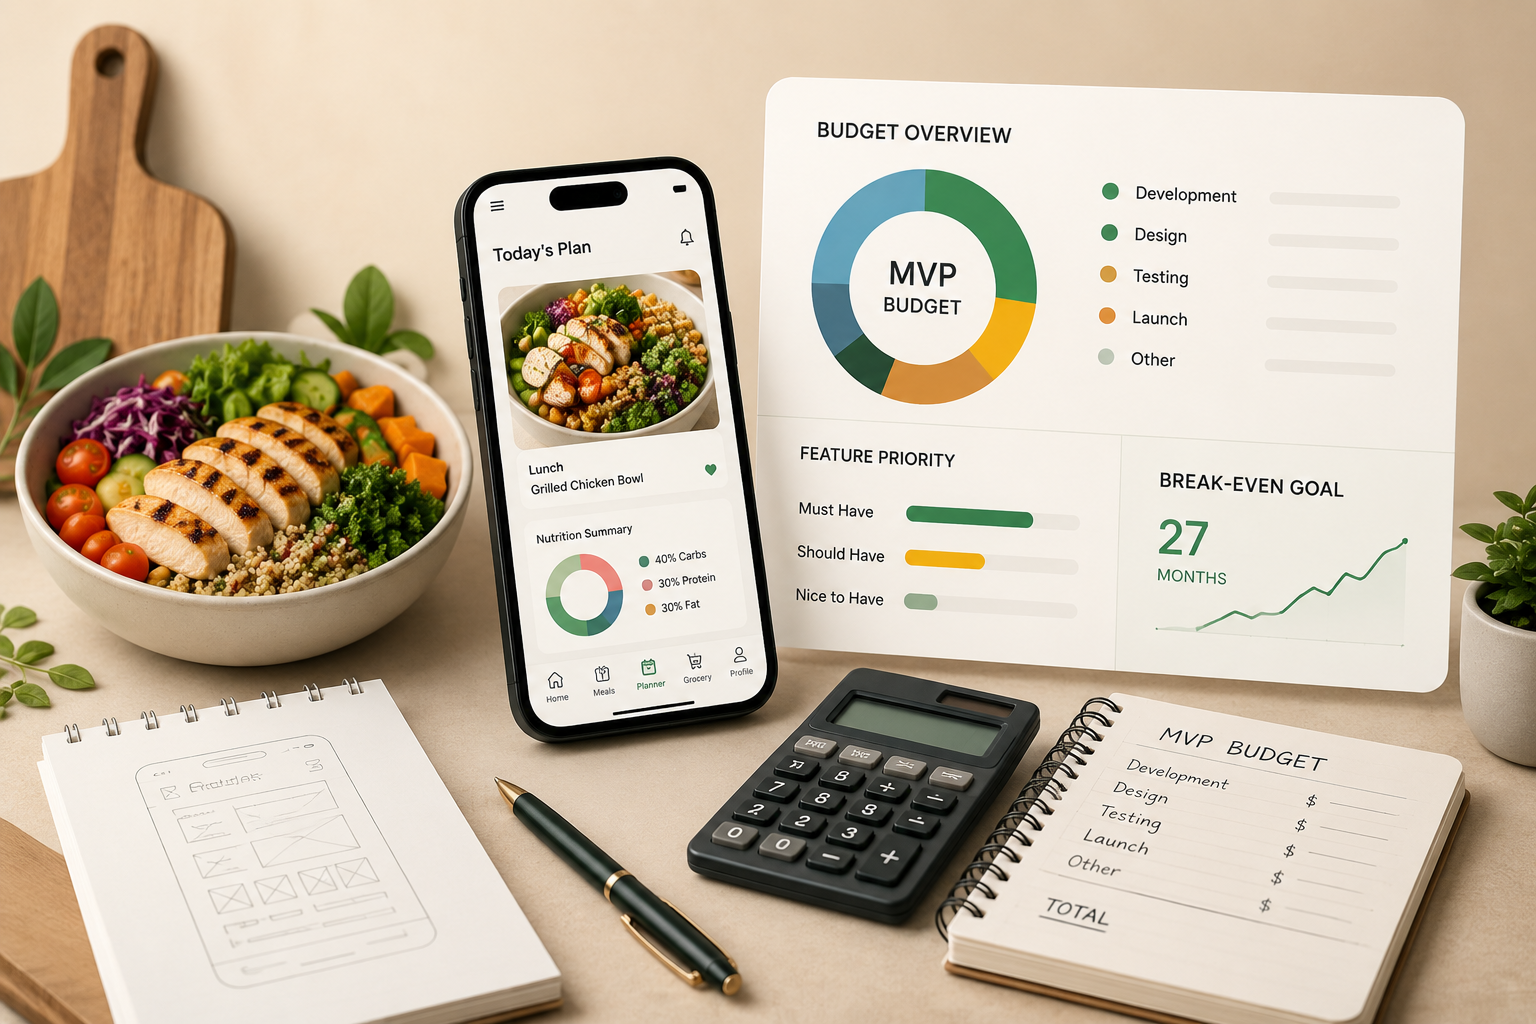
Your success criteria are simple: a documented MVP scope, a realistic financial plan that targets break-even within 27 months, and a launch timeline you can actually follow. Whether you are a food blogger, recipe influencer, or health coach, this guide gives you the financial clarity to move forward with confidence.
Prerequisites and Setup: What You Need Before You Start
Before diving into budgets and feature lists, make sure you have the following in place. Skipping these steps is the most common reason meal planning app projects stall before they launch.
A validated audience or niche — You should already know who your app serves (e.g., busy parents, keto followers, macro-tracking athletes). If you have not validated your idea yet, start with this guide on choosing and validating your membership idea.
A rough content library — At least 20 to 50 recipes or meal plans you own or have rights to use.
A business email and basic brand assets — Logo, color palette, and a domain name.
A spreadsheet tool — Google Sheets or Excel for budget tracking.
Access to competitor apps — Download 3 to 5 meal planning apps to study their feature sets and pricing.
Time estimate: Completing this entire tutorial takes 4 to 6 hours of focused work. The build phase it produces will span 3 to 6 months depending on your chosen approach.
Why an MVP-First Approach Saves Your Meal Planning App Launch Strategy
The North America meal planning app market was valued at $102.30 million in 2023 and is projected to reach $250.91 million by 2030. That growth attracts competition. Launching with every feature you can imagine is a guaranteed way to burn through your budget before earning a single dollar.
An MVP-first meal planning app launch strategy forces you to ship only what matters, learn from real users, and reinvest revenue into improvements. In contrast, the alternative (building a full-featured app from day one) routinely costs $150,000 to $250,000+ and takes 12 or more months. Most food creators and content professionals cannot absorb that risk.
This tutorial follows a lean, phased approach. You will scope the smallest product that delivers real value, budget conservatively, and plan your marketing spend so customer acquisition costs stay manageable.
Step 1: Define Your Core Value Proposition in One Sentence
Open a blank document and write one sentence that answers: "What does my app do for my audience that they cannot easily do themselves?" Be specific. "Meal planning" is too broad. "Weekly keto meal plans with automated grocery lists for busy professionals" is actionable.
Expected result: A single sentence you could read to a stranger and have them immediately understand the product. From there, this sentence will guide every feature decision that follows.
Common failure: Writing a paragraph instead of a sentence. If you cannot distill it, your scope is too wide. Cut until it fits one line.
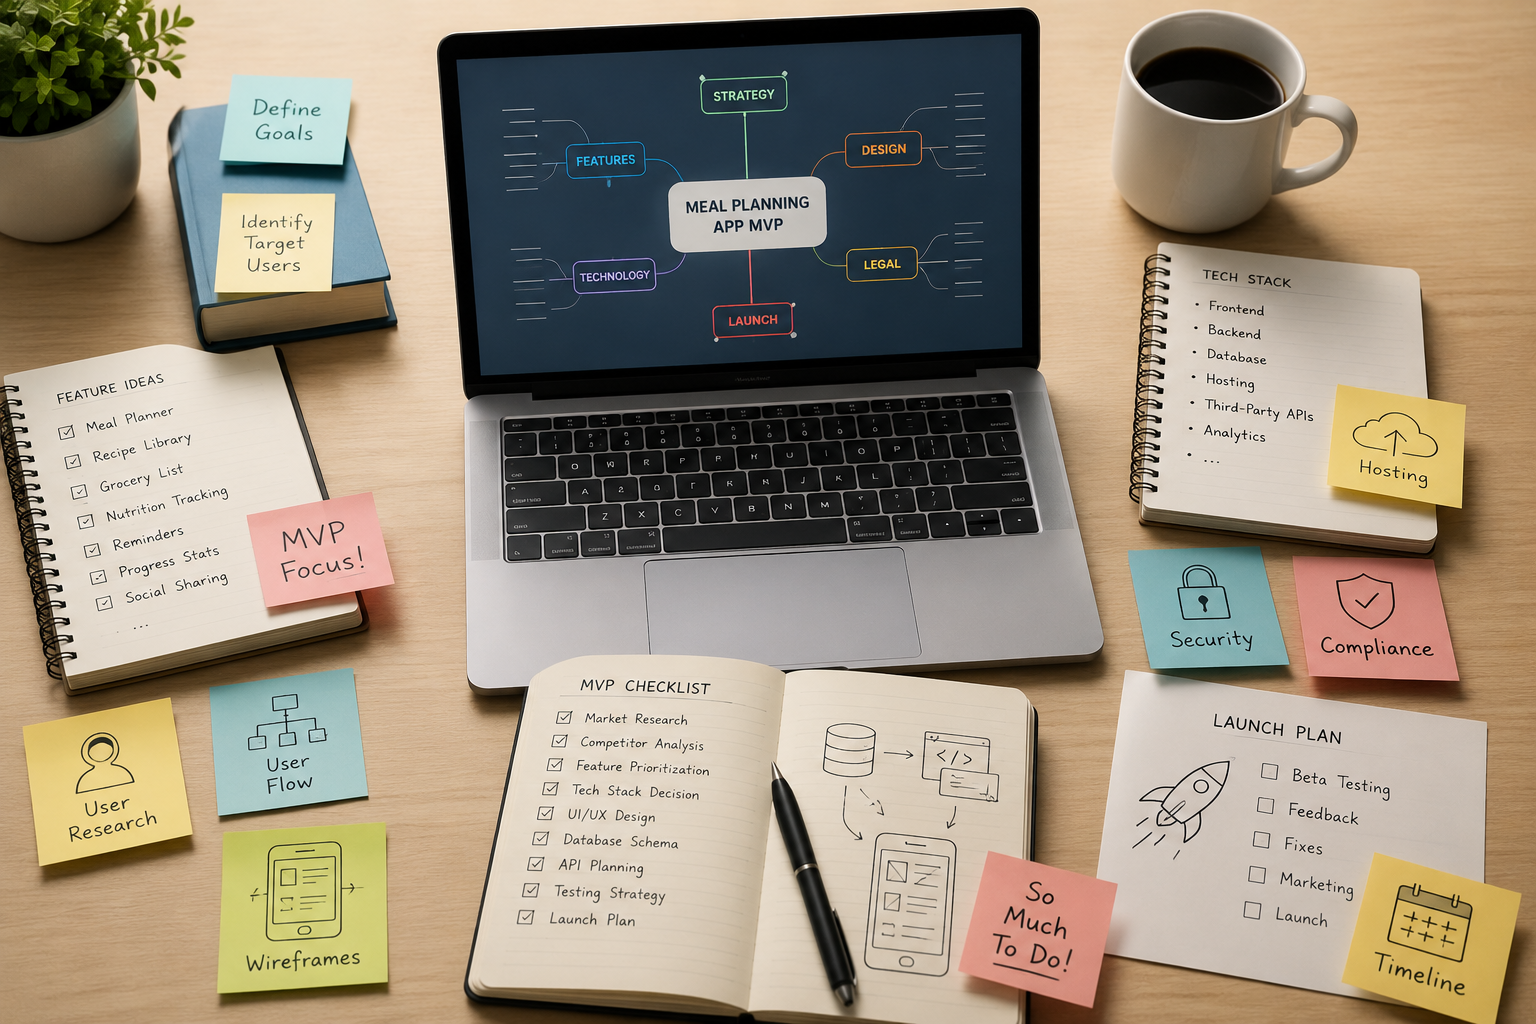
Step 2: Audit Competitor Features and Identify Your MVP Scope
Open the 3 to 5 competitor apps you downloaded during setup. For each app, list every user-facing feature in a spreadsheet. Common features include meal calendars, recipe search, shopping lists, nutritional breakdowns, dietary filters, and social sharing.
Now sort your combined list into three columns:
Must-Have (MVP) — Features without which your value proposition fails. Typically: meal plan display, recipe pages, and automated shopping lists.
Nice-to-Have (V2) — Features that improve retention but are not required for first use. Examples: AI-powered recipe suggestions, community forums.
Future (V3+) — Advanced features like barcode scanning, grocery delivery integration, or wearable sync.
Checkpoint: Your Must-Have column should contain no more than 5 to 7 features. If it has more, revisit your value proposition and ask which features directly support that single sentence.
Common failure: Treating "nice-to-have" features as essential. Every feature you add to the MVP column increases your development cost and timeline. Be ruthless.
Step 3: Choose Your Build Path (Custom Dev vs. No-Code Platform)
This is the highest-impact budget decision you will make. You have two primary paths:
Path A: Custom Development
Hiring developers to build from scratch. Base MVP development costs start around 1,200 hours at $65/hour ($78,000), plus $5,000 to $35,000 for third-party integrations like payment gateways and grocery APIs. Total range: $40,000 to $250,000+ depending on features and platforms. Timeline: 4 to 12 months.
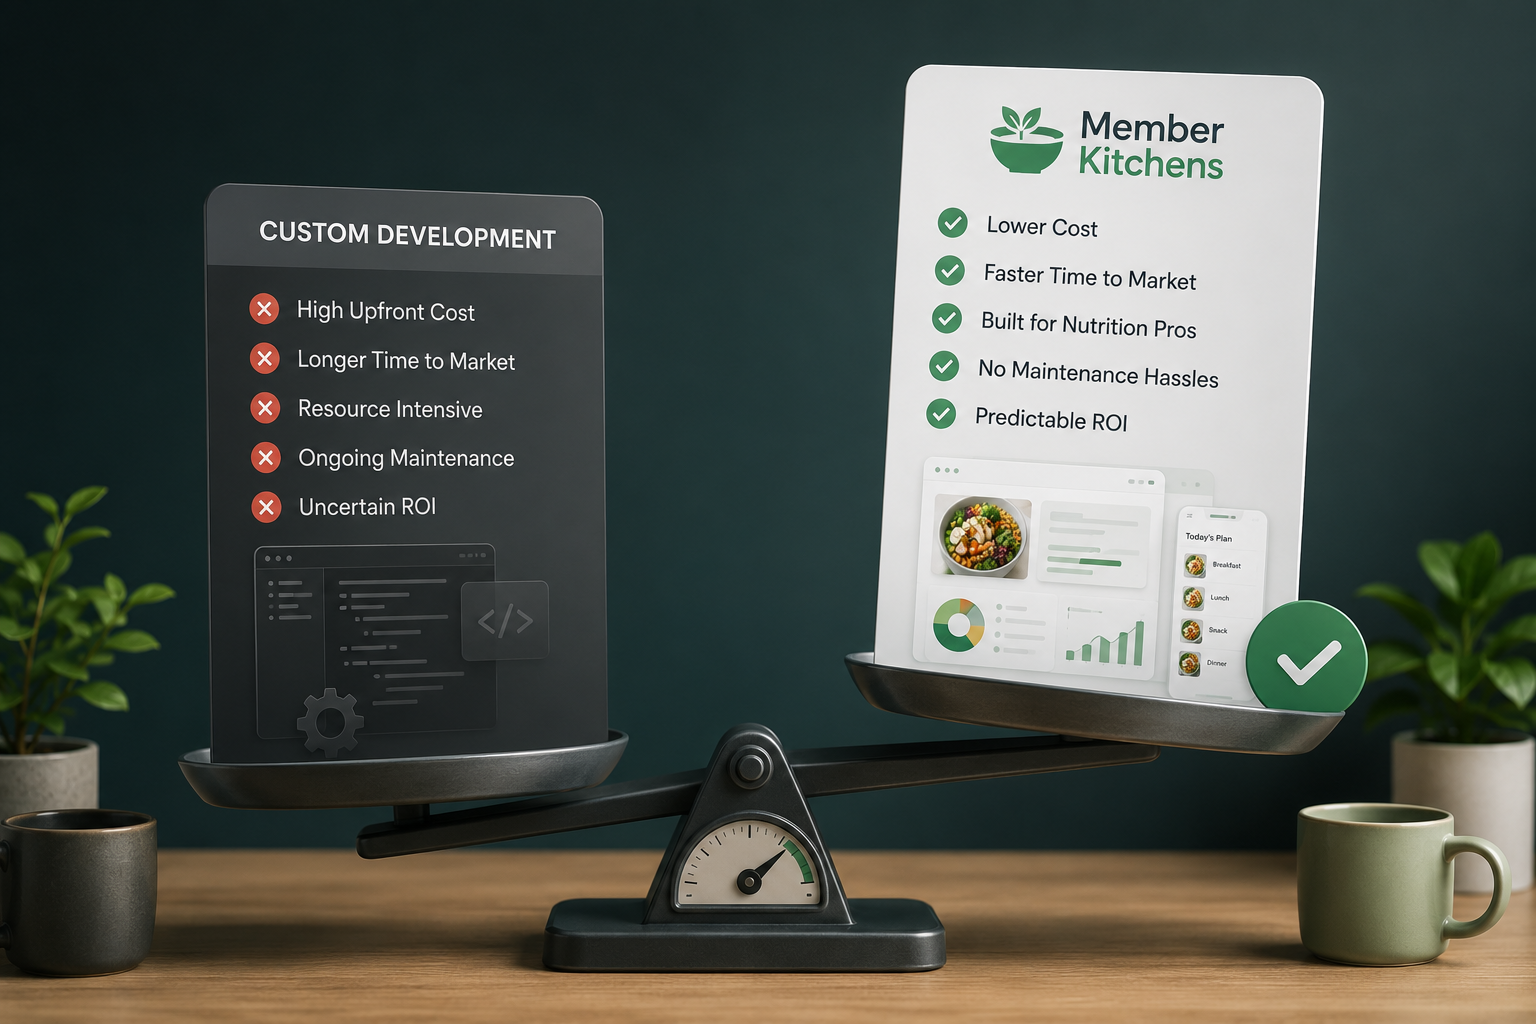
Path B: No-Code or White-Label Platform
Using an existing platform to launch your branded app without writing code. This approach can reduce your upfront cost to a monthly subscription and get you live in days or weeks instead of months. The trade-off, however, is less customization at the outset.
For food content creators and nutrition professionals who are not developers, Path B is often the smarter starting point. As one example, Member Kitchens lets you launch a fully branded meal planning app with automated shopping lists and expert-designed layouts in minutes, removing the $78,000+ custom build entirely. After that, you can always migrate to a custom solution later once revenue justifies the investment.
Checkpoint: Document your chosen path and its estimated cost. If you chose custom development, get at least three quotes from agencies or freelancers before committing.
Common failure: Underestimating ongoing maintenance costs for custom apps. To avoid surprises, budget an additional 15 to 20% of your build cost annually for bug fixes, server costs, and updates. For a deeper look at why custom meal planning app development can drain your budget, review the real cost breakdown.
Step 4: Build Your Financial Model and Set Your Meal Planning App Development Budget
Open your spreadsheet tool and create three tabs: CAPEX (one-time costs), OPEX (monthly recurring costs), and Revenue Projections.
CAPEX Tab
List every one-time expense: development or platform setup, branding, legal (terms of service, privacy policy), and initial content creation. According to Financial Models Lab, a core MVP build for essential features like meal organization and automated shopping list generation costs approximately $150,000 over six months if you go the custom route. However, if you chose a no-code platform, this number drops dramatically.
OPEX Tab
Include hosting, platform subscription fees, payment processing (typically 2.9% + $0.30 per transaction), email marketing tools, customer support, and content updates. Estimate these monthly and multiply by 27 to reach the break-even horizon.
Revenue Projections Tab
Define your subscription tiers. A common structure for meal planning apps:
Free trial — 7 to 14 days, full access
Monthly — $9.99 to $14.99/month
Annual — $79.99 to $119.99/year (discount incentivizes commitment)
Checkpoint: Your total minimum startup budget (CAPEX + 27 months of OPEX) should be clearly documented. For reference, the total minimum startup budget for a custom-built meal planning app is estimated at $245,000 covering initial CAPEX and a 27-month runway to break-even.
Step 5: Define Product Tiers and Pricing Before You Build
Pricing is not something you figure out after launch. It shapes your entire business model, from customer acquisition cost targets to feature prioritization. Define your tiers now.
For each tier, answer these questions:
What features are included?
What is the price point?
What is the expected conversion rate from free trial to paid?
What is the target customer lifetime value (LTV)?
A healthy SaaS model targets an LTV-to-CAC ratio of at least 3:1. If your average subscriber pays $12/month and stays for 8 months ($96 LTV), your CAC should stay below $32. For launch, aim for a CAC between $11 and $15. Exceeding $20 threatens your payback timeline.
Common failure: Setting prices too low to "attract users." After all, low prices attract price-sensitive users who churn fastest. Price based on the value your expertise delivers, not on what competitors charge.
Step 6: Secure Initial Capital Without Overspending
With your budget documented, identify your funding source. Most food creators and content professionals fund their MVPs through one or a combination of these methods:
Self-funding (bootstrapping) — Using savings or revenue from existing content, courses, or sponsorships.
Pre-selling — Offering founding memberships at a discount before the app launches. This validates demand and generates capital simultaneously. Learn how to generate recurring revenue with a meal plan membership program using this approach.
Small business loans or grants — SBA microloans or creator-focused grants.
Revenue from a no-code MVP — Launch a basic version quickly, generate revenue, and reinvest into a more robust product.
Checkpoint: You should have a documented funding plan that covers at least your CAPEX and 6 months of OPEX. Do not begin development until this is secured.
Step 7: Build and Launch Your MVP
With your scope locked, budget set, and funding secured, it is time to build. Follow this sequence regardless of your chosen build path:
Week 1 to 2: Set up your platform or kick off development. Upload your initial recipe library (minimum 30 recipes). Configure branding, colors, and layout.
Week 3 to 4: Build your subscription and payment flow. Test the complete user journey from signup through meal plan access to shopping list generation.
Week 5 to 6: Run a closed beta with 10 to 20 users from your existing audience. Collect feedback on usability, content quality, and perceived value.
Week 7 to 8: Fix critical issues from beta feedback. Prepare launch marketing assets (landing page, email sequences, social content).
If you are using a no-code platform, this timeline compresses significantly. In that case, you can realistically go from setup to beta in under a week. For a detailed walkthrough, see how to create your own meal planning app.
Common failure: Skipping the beta phase. Launching without real user feedback almost always results in a poor first impression and high early churn.
Step 8: Implement a Performance Marketing Strategy on a Lean Budget
Your marketing budget should not exceed your development budget in the first year. With a target CAC of $15 and a $150,000 annual marketing budget, you can acquire approximately 10,000 paying subscribers from 12,500 free trials (assuming an 80% trial-to-paid conversion rate).
For most food content creators, the initial marketing mix should prioritize:
Your existing audience — Email list, social followers, blog readers. This is your lowest-cost acquisition channel.
Content marketing and SEO — Publish meal planning tips, recipe roundups, and nutrition guides that drive organic traffic to your app landing page.
Paid social (Instagram, TikTok, Pinterest) — Start with $20 to $50/day, test 3 to 5 ad creatives, and scale only what performs below your $15 CAC target.
Referral incentives — Offer existing subscribers a free month for every friend who converts to paid.
Checkpoint: After 30 days of marketing, calculate your actual CAC. If it exceeds $20, pause paid channels and double down on organic and referral strategies.
Step 9: Monitor Key Metrics Weekly
Once live, track these metrics every week in your spreadsheet or analytics dashboard:
Trial signups — Are people finding and trying your app?
Trial-to-paid conversion rate — Target 60 to 80%. Below 50% signals a value or onboarding problem.
Monthly recurring revenue (MRR) — Your north star financial metric.
Churn rate — Monthly cancellations divided by total subscribers. Keep below 8% monthly.
Customer acquisition cost — Total marketing spend divided by new paying subscribers.
Customer lifetime value — Average revenue per user multiplied by average subscription length.
Common failure: Tracking vanity metrics like app downloads or page views instead of revenue-driving metrics. At the end of the day, downloads mean nothing if they do not convert to paying subscribers.
Configuration and Customization: Adjusting Your MVP for Your Niche
Your MVP is not a one-size-fits-all product. Here are the key variables you should adjust based on your specific audience:
Dietary focus — Configure your recipe library and filters around your niche (vegan, paleo, allergen-free, macro-based). This is a must-change setting, not optional.
Meal plan cadence — Some audiences prefer weekly plans, others want daily flexibility. Start with weekly (it is simpler to produce) and add daily options in V2.
Pricing — Test two price points during your first 90 days using A/B testing or sequential pricing experiments. Safe default: $9.99/month or $89.99/year.
Trial length — 7 days is standard, but 14 days gives users more time to experience value. If your trial-to-paid conversion is below 50%, extend the trial before cutting price.
Branding depth — At minimum, use your logo, brand colors, and a custom welcome message. Avoid generic templates that make your app look like every other meal planner.
Verification and Testing: Confirm Your MVP Is Ready
Before announcing your launch publicly, run through this verification checklist with at least 3 test users who were not involved in building the app:
Signup flow: Can a new user create an account and access a meal plan within 2 minutes?
Payment processing: Does the subscription charge correctly? Test with a real card.
Shopping list generation: Select a weekly meal plan and generate a shopping list. Verify all ingredients appear and quantities are accurate.
Mobile responsiveness: Test on at least 2 different phone models and 1 tablet.
Cancellation flow: Can a user cancel their subscription without contacting support? (This is legally required in many jurisdictions.)
Success definition: All 3 test users complete every task above without asking for help. Any point of confusion is a bug that needs fixing before launch.
Common Errors and Fixes
"My development costs are already double the estimate"
Cause: Scope creep. Features from the Nice-to-Have column migrated into the MVP during development. Fix: Freeze the feature set immediately. Ship what you have and add features post-launch based on user feedback.
"Trial-to-paid conversion is below 40%"
Cause: Users are not experiencing enough value during the trial period. Fix: Add an onboarding email sequence that guides users to generate their first meal plan and shopping list within 24 hours of signup. Extend the trial to 14 days if it is currently shorter.
"CAC is above $25"
Cause: Paid ad targeting is too broad or ad creative is not compelling. Fix: Narrow your audience targeting to match your exact niche. Pause underperforming campaigns. Shift budget to organic content and referral programs.
"Users sign up but never open the app again"
Cause: No engagement loop. Fix: Implement weekly push notifications or emails with the new meal plan. Add a "Plan of the Week" feature on the home screen.
"Payment gateway returns errors during checkout"
Cause: Misconfigured Stripe or payment provider API keys. Fix: Verify your API keys are set to live mode (not test mode). Confirm your account has completed identity verification with your payment provider.
Next Steps: Extending Your Meal Planning App
Once your MVP is live and generating revenue, consider these extensions:
Add community features — A members-only forum or group chat increases retention and gives you direct feedback.
Introduce premium tiers — Offer personalized coaching, custom macros, or exclusive recipe collections at a higher price point.
Expand content partnerships — Collaborate with other food creators to cross-promote and share recipe libraries, reducing your content production burden.
Your MVP is not the finish line. It is the starting point for a subscription-based meal planning business that grows with your audience. Above all, focus on retention, listen to your subscribers, and reinvest revenue into the features they actually request.
Frequently Asked Questions
What are the key steps to launch a meal planning SaaS app?
Start by validating your audience and niche, then define your core value proposition in one sentence. Scope your MVP to 5 to 7 essential features, choose between custom development and a no-code platform, build a financial model, secure funding, and launch with a closed beta before going public. Post-launch, focus on tracking metrics like trial-to-paid conversion and customer acquisition cost.
Why is it important to define product tiers and pricing before launching a meal planning app?
Pricing directly shapes your business model, including how much you can spend on customer acquisition and which features belong in each tier. As a result, setting tiers early lets you calculate your target LTV-to-CAC ratio and ensures your financial model is realistic before you invest in development.
How can I secure initial capital for my meal planning app launch?
Most food creators fund their MVPs through bootstrapping, pre-selling founding memberships at a discount, small business loans, or by launching a low-cost version on a no-code platform and reinvesting early revenue. Of these options, pre-selling is especially effective because it validates demand and generates capital at the same time.
How much does it cost to build a meal planning app MVP?
Custom development ranges from $40,000 to $250,000+ depending on features and platforms. A base estimate is around 1,200 hours at $65/hour ($78,000) plus $5,000 to $35,000 for integrations. Alternatively, no-code and white-label platforms can reduce upfront costs to a monthly subscription, making them a popular choice for creators without a technical background.
How can I optimize the trial-to-paid conversion rate for my meal planning app?
Focus on getting users to experience your core value (generating a meal plan and shopping list) within the first 24 hours. Use an onboarding email sequence, keep the trial length at 14 days, and remove friction from the payment flow. A healthy target is 60 to 80% conversion from trial to paid.
Which metrics should I monitor to ensure my meal planning app is on track for break-even?
Track trial signups, trial-to-paid conversion rate, monthly recurring revenue (MRR), churn rate, customer acquisition cost (CAC), and customer lifetime value (LTV) weekly. If your CAC exceeds $20 or your churn rate exceeds 8% monthly, take corrective action immediately.
Sources
https://memberkitchens.com/blog/how-to-choose-and-validate-your-membership-idea
https://www.intelmarketresearch.com/north-america-meal-planning-app-market-market-41395
https://appinventiv.com/blog/hellofresh-app-development-cost/
https://financialmodelslab.com/blogs/startup-costs/nutritionist-meal-planning-app
https://financialmodelslab.com/blogs/profitability/nutritionist-meal-planning-app
https://memberkitchens.com/blog/recurring-revenue-to-meal-plan-program
https://memberkitchens.com/blog/how-to-create-your-own-meal-planning-app